Еще совсем недавно плоская крыша считалась прерогативой однообразных городских многоэтажек и промышленных зданий. Сейчас ситуация изменилась. Все больше частных застройщиков прибегают к этому архитектурному решению, пытаясь увеличить полезную площадь дома за счет обустройства на крыше террасы или смотровой площадки. Отличная перспектива, не так ли?
Но также она может стать настоящей головной болью, если элементы плоской крыши подобраны или расположены неправильно, с нарушением рекомендованных специалистами технологий. Чтобы не попасть впросак, разберемся в конструкциях плоских кровель, их компонентах и послойном распределении элементов.
Начнем с азов. На самом деле плоская кровля только визуально производит впечатление абсолютной горизонтальности. Небольшой уклон все-таки есть – 1-5° (1,7-8,7%). Визуально и при эксплуатации он совершенно не ощутим, однако позволяет атмосферным осадкам свободно стекать к точкам водосбора – в этом его основная задача.
В отличие от скатных аналогов, плоская крыша не имеет стропильного каркаса и, по сути, представляет собой горизонтальное перекрытие, опирающееся на стены постройки. Его особенность – в усиленных слоях тепло- и гидроизоляции, необходимых по причине сообщения кровли с окружающей средой.
Привлекательность плоской кровли для застройщиков обоснована следующими преимуществами:
- Сниженной ценой. По сравнению со скатной кровлей, плоский аналог обладает меньшей площадью, соответственно расходы на материалы – ниже.
- Упрощенным монтажом и дальнейшим обслуживанием. Обустройство плоской конструкции проще, чем скатной, так как передвигаться по горизонтальной плоскости легче, чем по наклонной. По этой же причине сложностью не отличаются и различные мероприятия по обслуживанию самой кровли и находящихся на ней устройств (дымоходов, вентиляторов, антенн и т.п.).
- Возможностью получения дополнительной полезной площади (при эксплуатируемой кровле). Поверхность плоской крыши можно с легкостью использовать в качестве террасы, прогулочной площадки и даже… сада с настоящим газоном.
Главным элементом плоской кровли является прочное основание: железобетонные плиты, профнастил или сплошная поверхность из досок, фанеры, ОСП, ЦСП (при оборудовании кровли по деревянным балкам). Само же покрытие кровли выполняется из нескольких слоев. Их количество, место расположения в конструкции и материалы изготовления зависят от назначения кровли и ее типа.
Типы плоских кровель:
- Неэксплуатируемая кровля. Самая простая, не несущая никаких дополнительных функций, кроме защиты помещения от влияния окружающей среды. Она не используется для обустройства мест рекреационного или хозяйственного назначения. Все, что от нее требуется, — достаточная защитная функция, способность выдерживать снеговые и ветровые нагрузки, а также вес работников, проводящих обслуживающие мероприятия. То есть при строительстве такой кровли расчет ведется на то, что одновременно на ней смогут находиться 1-2 человека, причем не постоянно, а только на время обслуживания и ремонта покрытия.
- Эксплуатируемая кровля. Оборудуется для выполнения каких-то дополнительных функций, кроме непосредственно кровельных. Например, на эксплуатируемых кровлях устраивают спортивные площадки, террасы, парковки, сажают газоны и разбивают цветники.
- Инверсионная кровля. Характеризуется нетрадиционным размещением слоев – теплоизоляционные маты (ЭППС) укладывают практически в самом верху пирога. Гидроизоляцию монтируют под слоем утеплителя. Такое решение помогает продлить срок службы гидроизоляционного покрытия, а соответственно и самой кровли. Инверсионные крыши могут быть как эксплуатируемыми (чаще всего), так и неэксплуатируемыми.
Каждый тип плоской кровли имеет свои конструкционные особенности, позволяющие применять конкретные материалы и размещат
Кровельный пирог для плоской кровли
Дома, имеющие плоские крыши, как на фото, это в основном многоэтажные здания промышленного или жилого назначения. Встретить частные домовладения с такой кровлей можно редко, их дизайн эксклюзивен и они выглядят оригинально и стильно. Использовать их поверхность хозяева дома могут по собственному усмотрению. Например, инверсионная плоская кровля позволяет даже обустраивать зоны отдыха с газонами, цветниками, декоративными деревьями и беседками.
Считается, что правильно выполненный пирог плоской кровли содержит следующие слои:
Подготовка основания для плоской кровли
Начинают монтаж крыши с подготовки для нее основания. Его нужно выровнять, очистить места, где имеются трещины и дефекты в бетоне, заполнить их полиуретановым герметиком, из расчета, что на один погонный метр при ширине шва 5 сантиметров и глубине 0,3 сантиметра расходуют 180 грамм материала.
Затем выполняют грунтование, используя эпоксидный праймер. Для пористых поверхностей потребуется на один «квадрат» площади 0,2 килограмма, а для непористых оснований – 0, 12 килограмма. Праймер необходимо подготовить: при помощи низкоскоростного миксера его перемешивают до образования однородной массы, после чего разводят с водой в пропорции 1:2. На поверхность его наносят кистью или валиком.

Дальше, когда создают кровельный пирог для плоской кровли, поверхность основания подвергают армированию путем нанесения специальной мастики (норма расхода 14 килограммов на 1 кубометр). Прежде, чем выполнять полимеризацию, на нее укладывают строительный бинт, после завершения работы еще раз покрывают мастикой.
Утепление кровли и теплоизоляционные материалы
Сохранение тепла в доме обеспечивает утеплитель. Что касается теплоизоляционного материала, то его монтируют таким образом, чтобы он плотно прилегал к поверхности кровли и ее выступающим частям, таким как парапеты, дымовые трубы, вентиляционные блоки и т.д.
Немаловажное значение имеет качество выбранного утеплителя, обеспечивающего обогрев плоской кровли. При правильно подобранных теплоизоляционных материалах для крыши можно значительно сэкономить на отоплении дома., выполнив грамотный обогрев кровли. Особое внимание следует уделять таким показателям: пожаробезопасности, низкой теплопроводности, паропроницаемости, устойчивости к механическим воздействиям и влаге.
Материал, который выбран в качестве утеплителя, должен обладать устойчивостью к точечным нагрузкам, поскольку в 8 случаях из 10 они становятся причиной появившихся проблем с кровельным перекрытием.
Основными из них являются:
- нарушение гидроизоляции, в результате чего повреждается плоская кровля – пирог кровли которой достигает влага и разрушает его;
- причинение крыше серьезных повреждений по причине намерзания снежной массы в случае наступления оттепели, увеличение теплопотерь и образование «мостиков холода».
Одним из самых востребованных теплозащитных материалов считается каменная вата, которая выдерживает температуру порядка 1000 градусов. Кроме этого, с ней легко работать. В качестве теплоизоляции нередко используют пенополиуретан, экструзионный пенополистирол, пеностекло, пенобетон.

Каменная вата. Ее плиты имеют две степени плотности. Ту сторону, которая обладает повышенной плотностью, часто помечают черной полосой и она должна находиться сверху. Плиты укладывают на поверхность крыши и склеивают.
Пенополиуретан (сокращенно ППУ). Этот материал высокотехнологичен и обладает отличными гидроизоляционными показателями. У него имеется недостаток – ППУ не может быть финальным покрытием, так как ультрафиолет разрушает его, делая хрупким, и тем самым сокращается срок эксплуатации утеплителя. Нельзя не отметить хорошую ремонтопригодность пенополиуретана. На один кубометр потребуется от 60 до 80 килограммов этого утеплителя. ППУ склонен к горению, но горючие качества снижаются при использовании его в таком объеме. Если на пенополиуретан попадает прямой огонь, он начинает плавиться, но при ликвидации источника воспламенения затухает практически мгновенно.
Пенобетон. Качественным получается утепление при расходе на один кубометр 250 килограммов этого материала. Но такое количество утеплителя повышает нагрузку на крышу.

Экструзионный пенополистирол. Когда строится плоская совмещенная кровля, этот материал используют массово, поскольку он прост в монтаже. Теплоизоляционные плиты
укладывают на всей поверхности, после чего склеивают между собой.
Пеностекло. Отличается устойчивостью к кислотам и высоким температурам, обладает низкой теплопроводностью, по причине чего обеспечивается отличное утепление. Для его монтажа требуется, чтобы поверхность была ровной и сухой, ее предварительно заливают расплавленным битумом. Блоки материала укладывают на определенном расстоянии от смежных элементов. Для фиксации положения плиты и извлечения из-под нее излишков битума на ее середину нажимают ногой. Причиной, по которой материал не получил широкое применение, является его достаточно высокая цена.
Создание гидроизоляции на плоской кровле
Гидроизоляцию, входящую в состав плоской крыши, выполнить можно многими способами, но наиболее распространенным считается битумный. Для создания гидроизоляционного слоя битумную мастику в течение 5 минут размешивают при помощи дрели с насадкой. При этом первый из наносимых слоев делают более жидким, чем остальные. Наносят мастику из расчета 90-120 грамм на один квадратный сантиметр площади поверхности. Следующий битумный слой укладывают после полного высыхания, на что уходит примерно 10-12 часов. Надежность гидроизоляции зависит от количества слоев: чем их больше, тем защита лучше.
Устройство плоской кровли, видео инструкция:
Особенности обустройства плоской кровли
Во многом технология устройства плоской крыши зависит от того, планируется или нет их эксплуатация. То, из каких слоев состоит разрез плоской крыши, объясняется ее видом. Например, устройство инверсионной кровли предполагает, что теплоизоляционный слой располагается над гидроизоляцией, а не под ней как на традиционных крышах. Таким образом, гидроизоляционная защита не разрушается от действия ультрафиолета, механических нагрузок, температурных колебаний. Неэксплуатируемая кровля не может использоваться, ее монтаж самый доступный по стоимости. Поверх кровельного «пирога» иногда для создания молниезащиты устанавливают в ряд держатель проволоки для плоской кровли, предварительно выполнив расчет молниезащиты. На эксплуатируемых крышах обустраивают зоны отдыха, спортивные и даже вертолетные площадки, бассейны и т.д. Покрытие их стоит дороже, но и пирог эксплуатируемой кровли прослужит на протяжении более длительного срока. Прочитайте также: «Состав кровли — элементы крыши».Типы плоских кровель и их устройство
Кровли домов разделяются на скатные и плоские. Вторые бывают неэксплуатируемыми и эксплуатируемыми, инверсионными и традиционными. В зависимости от желания застройщика на плоской кровле можно устроить зону отдыха, огород, баскетбольную площадку или гараж. Тем более что строится она просто и быстро, ибо нет необходимости в стропильном каркасе.
Типы плоских покрытий крыш
Плоская кровля – покрытие крыши, угол наклона которого составляет 1÷4º. Она существенно отличается от скатных аналогов, обладает особыми преимуществами и недостатками, разделяется на типы.
- Эксплуатируемая. Площадь является полезной – в зависимости от прочности основания и кровельного пирога на поверхности устраивается терраса со столиком и стульями, лужайка с цветником, пляж с бассейном, спортивная площадка или гараж.
- Неэксплуатируемая. Крыша выполняет только свою прямую функцию, посещается лишь для обслуживания и ремонта.
- Традиционная. Состоит в определенной последовательности с плиты перекрытия, паро-, тепло-, гидроизоляций и финишного покрытия.
- Инверсионная. Порядок монтажа утеплителя и гидроизоляции обратный традиционному варианту.
У горизонтальной крыши существуют следующие плюсы и минусы:
- устраивается в разных местностях независимо от силы ветровой нагрузки;
- меньшая площадь покрытия по сравнению со скатными крышами при одинаковом периметре, а это экономия средств при монтаже, и на отоплении;
- сравнительная простота строительства, поскольку отсутствует необходимость в сооружении стропильной системы;
- является дополнительной полезной площадью, которую можно обустроить по своему вкусу;
- на горизонтальную плоскость воздействует снеговая нагрузка с максимальным коэффициентом;
- высокий риск протечек, основанный на природных, технических и технологических факторах;
- сравнительно небольшая практичность в условиях продолжительной, снежной и суровой зимы.
Устройство традиционной кровли
Выполнение традиционного (классического) покрытия начинается с подготовительных работ, заключающихся в очистке от мусора несущего основания – бетонных или ж/б плит. Иногда таковым является профнастил марки Н.
- На поверхности основания производится разуклонка – цементно-песчаной стяжкой оформляется уклон плоской кровли для стока осадков от периферии к водосточным воронкам. Значения углов должны быть не менее 1,5%.
- Чтобы предохранить утеплитель от влаги, исходящей от плит перекрытия, поверх стяжки устраивается пароизоляция. Полосы материала укладываются внахлест между собой в 15 см и на стены парапета.
- Теплоизоляция выполняется плитами базальтовой ваты Baswool или экструдированного пенополистирола Пеноплэкс. Допускается применение керамзита. В целях экономии и для перекрытия «мостиков холода» снизу монтируются плиты меньшей плотности толщиной до 200 мм, сверху – большего удельного веса высотой от 50 мм. Укладка выполняется в шахматном порядке с перевязкой, крепление производится к плитам перекрытия тарельчатыми дюбелями – по 5 штук на элемент.
- Поверх утеплителя устраивается гидроизоляция – настилается ПВХ мембрана Пластфоил, стыки между полотнами которой свариваются специальным прибором. Край материала заводится на парапеты с переходом через смягчающий излом пенопластовый клин.
- Если кровля предвидится неэксплуатируемой, на мембрану в несколько слоев накладывается рулонный битумизированный материал или наплавляется еврорубероид. На случай выполнения ремонтных работ на поверхность монтируются переходные мостики.
- Если покрытие крыши будет эксплуатироваться, пирог плоской кровли усиливается цементной стяжкой толщиной от 50 мм, после чего облицовывается тротуарной плиткой. Утеплитель в таком случае должен быть максимальной плотности. При устройстве зеленой террасы, в конструкцию добавляется гравийный дренаж и фильтрующий слой в виде геотекстиля.
По ходу строительства кровельного пирога рекомендуется устанавливать аэраторы, являющиеся элементами вентиляционной системы. Представляют они собой пластиковые или металлические трубы с колпаками, которые монтируются в наивысших точках поверхности по всей ее площади. Благодаря возможности избавляться от накапливаемых паров или «дышать», кровля эффективней выполняет свои функции и дольше служит.
Инверсионная кровля
Подвиды
Инверсионная кровля принадлежит к категории эксплуатируемых и отличается разнообразием в устройстве. Зависит оно от проектных решений, основанных на расчетных нагрузках и выборе дизайнерского исполнения. Повышенной популярностью пользуются несколько вариантов горизонтальных крыш:
- с балластным покрытием, роль которого играет гравийная засыпка;
- в виде зеленой зоны с газоном и растениями без глубокой корневой системы. Для обеспечения нормального водоотвода, к почвенному и дренажному гравийному пластам добавляется фильтрующий материал;
- со сплошной тротуарной или керамогранитной плиткой, на которую устанавливаются столики со стульями под зонтом, разборные спортивные снаряжения, шезлонги;
- в виде автомобильного паркинга с финишным покрытием из армированной монолитной плиты. Применяется в основном на крупных сооружениях, например, гипермаркетах.
Преимущества
Благодаря конструктивным особенностям «пирога», в котором гидроизоляция расположена под утеплителем, а последний – покрыт разными функциональными слоями, плоская инверсионная кровля обладает рядом сравнительных преимуществ.
- Материал гидроизоляции надежно защищен от механических повреждений и УФ излучений, а также перепадов температуры в форме циклов «замораживание – оттаивание». Находясь под толщей слоев, он не нуждается в обслуживании.
- Поскольку при монтаже, в отличие от утеплительных плит, мембраны фиксируются жестко, риск их разрушений от критических напряжений сводится к нулю.
- При необходимости после простого демонтажа теплоизолятор может использоваться вторично.
- Кровельный пирог сравнительно легко ремонтируется.
- После выполнения разуклонки и гидроизоляции можно производить как внешние, так и внутренние работы.
Среди минусов инверсионной кровли следует отметить дороговизну ее устройства.
Монтаж
Роль основания преимущественно выполняют бетонные плиты покрытия (иногда – несущий профнастил), которые выдерживают вес конструкции кровельного пирога и установленного на него оборудования.
- В качестве начального гидроизоляционного слоя используются на выбор многие кровельные материалы: битумно-полимерные, состоящие из окисленного битума и подложки из полимерных волокон; мембраны ТПО, ЭПДМ или ПВХ, отличающиеся высокой эластичностью и быстрым монтажом через сварку. Крепятся они к основанию с помощью балласта, механическим способом или посредством клея. Мембраны эксплуатируются не менее 30 лет.
- На изоляцию укладывается утеплитель с абсолютной водонепроницаемостью, который при контакте с влагой не меняет свои эксплуатационные характеристики. Именно таким является экструдированный пенополистирол, известный под торговой маркой Пеноплэкс. Данный теплобарьер не нуждается в пароизоляции.
- Чтобы вода в водосточные воронки попадала условно чистой, поверх теплоизоляции устраивается гравийный дренажный слой, покрытый геотекстилем.
- По ходу выполнения работ тщательно заделываются места примыкания кровельных материалов к парапетам, трубным выходам и воронкам. Мембраны заводятся на стены на высоту от 0,5 м. Воронки усиливаются металлическими фартуками.
- В завершение создается финишное покрытие из гравия, плитки, газона.
В современных городах все чаще можно увидеть дома с плоской кровлей, на которой работает открытое кафе или зона отдыха с бассейном, устроена стоянка для автомобилей либо вертолетная площадка.
Плоские кровли

ТН-КРОВЛЯ Стандарт КМС
Система неэксплуатируемой крыши ТН-КРОВЛЯ КМС Стандарт представляет собой кровельный пирог по бетонному основанию с теплоизоляционным слоем из XPS-плит и покрытием из битумно-полимерных материалов.
Перейти
ТН-КРОВЛЯ Стандарт
Система неэксплуатируемой крыши ТН-КРОВЛЯ Стандарт представляет собой кровельный пирог по бетонному основанию с теплоизоляционным слоем из XPS-плит и покрытием из битумно-полимерных материалов.
Перейти
ТН-КРОВЛЯ Стандарт КВ
Система неэксплуатируемой крыши ТН-КРОВЛЯ Стандарт КВ представляет собой кровельный пирог по бетонному основанию с теплоизоляционным слоем из минераловатных плит и покрытием из битумно-полимерных материалов.
Перейти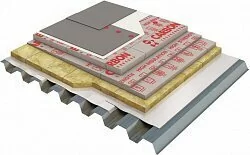
ТН-КРОВЛЯ Смарт
Система неэксплуатируемой крыши ТН-КРОВЛЯ Смарт представляет собой кровельный пирог по основанию из профилированного листа с комбинированным слоем теплоизоляции из минеральной ваты и PIR-плит и покрытием из полимерной мембраны.
Перейти
ТН-КРОВЛЯ Лайт
Система неэксплуатируемой крыши ТН-КРОВЛЯ Лайт представляет собой «облегченную» конструкцию кровли без теплоизоляции по бетонному основанию. Перейти
ТН-КРОВЛЯ Тротуар
Система устройства эксплуатируемой крыши с тротуарами и пешеходными зонами. Перейти
ТН-КРОВЛЯ Инверс
Система неэксплуатируемой инверсионной крыши ТН-КРОВЛЯ Инверс представляет собой кровельный пирог по бетонному основанию с гидроизоляцией из битумно-полимерных материалов и теплоизоляционным слоем из XPS-плит. Перейти
ТН-КРОВЛЯ Грин
Система эксплуатируемой крыши с зелеными насаждениями. Перейти
ТН-КРОВЛЯ Классик
Система неэксплуатируемой крыши ТН-КРОВЛЯ Классик представляет собой кровельный пирог по основанию из профилированного листа со слоем теплоизоляции из минеральной ваты и кровельным покрытием из полимерной мембраны.

ТН-КРОВЛЯ Смарт PIR
Система неэксплуатируемой крыши ТН-КРОВЛЯ Смарт PIR представляет собой кровельный пирог по основанию из профилированного листа с комбинированным слоем теплоизоляции из минеральной ваты и PIR-плит и покрытием из полимерной мембраны.
Перейти
ТН-КРОВЛЯ Фикс
Система неэксплуатируемой крыши ТН-КРОВЛЯ Фикс представляет собой кровельный пирог по основанию из профилированного листа с покрытием из битумно-полимерного материала, закрепленным механически.
Перейти
ТН-КРОВЛЯ Балласт
Система неэксплуатируемой балластной крыши по бетонному основанию с кровельным ковром из полимерной мембраны.
Перейти
ТН-КРОВЛЯ Универсал КМС
Система неэксплуатируемой крыши по бетонному основанию со сборной стяжкой. Перейти

ТН-КРОВЛЯ Универсал
Система неэксплуатируемой крыши ТН-КРОВЛЯ Универсал представляет собой кровельный пирог по бетонному основанию с утеплением из экструзионного пенополистирола и кровельным покрытием из битумно-полимерных мембран по сборной стяжке. Перейти
ТН-КРОВЛЯ Титан
Система неэксплуатируемой крыши ТН-КРОВЛЯ Титан представляет собой кровельный пирог по основанию из профилированного листа с теплоизоляционным слоем из базальтовой ваты, сборной стяжкой и кровельным покрытием из битумно-полимерного материала.
Перейти
ТН-КРОВЛЯ Фикс Проф
Система неэксплуатируемой крыши ТН-КРОВЛЯ Фикс Проф представляет собой кровельный пирог по основанию из профилированного листа с покрытием из битумно-полимерного материала, закрепленным механически. Подходит для объектов с любым влажностным режимом. Перейти
ТН-КРОВЛЯ Авто
Система эксплуатируемой крыши под автомобильную нагрузку Перейти
ТН-КРОВЛЯ Авто Лайт
Система эксплуатируемой крыши под автомобильную нагрузку. Перейти
ТН-КРОВЛЯ Фикс Бетон
ТН-КРОВЛЯ Фикс БетонСистема неэксплуатируемой крыши по бетонному основанию с механической фиксацией битумно-полимерного кровельного ковра.
Перейти
ТН-КРОВЛЯ Эксперт PIR
Система неэксплуатируемой крыши по железобетонному основанию с клеевым методом крепления теплоизоляционных плит PIR и кровельного ковра из полимерной мембраны LOGICROOF.

ТН-КРОВЛЯ СОЛО
Система неэксплуатируемой крыши ТН-КРОВЛЯ Соло представляет собой кровельный пирог по основанию из профилированного листа со слоем теплоизоляции из минеральной ваты с механической фиксацией кровельного покрытия из битумно-полимерного материала в один слой. Перейти
ТН-КРОВЛЯ СОЛО Проф
Система неэксплуатируемой крыши ТН-КРОВЛЯ Соло Проф представляет собой кровельный пирог по основанию из профилированного листа со слоем теплоизоляции из минеральной ваты с механической фиксацией кровельного покрытия из битумно-полимерного материала в один слой.
Перейти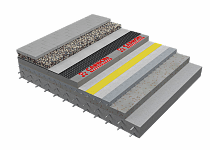
ТН-КРОВЛЯ Барьер Тротуар
Система эксплуатируемой крыши под пешеходную нагрузку с водоизоляционным слоем из полимерной мембраны. Перейти
ТН-КРОВЛЯ Классик Проф
Система неэксплуатируемой крыши ТН-КРОВЛЯ Классик Проф представляет собой кровельный пирог по основанию из профилированного листа со слоем теплоизоляции из минеральной ваты и кровельным покрытием из полимерной мембраны.

ТН-КРОВЛЯ Практик
Система неэксплуатируемой крыши ТН-КРОВЛЯ Практик представляет собой кровельный пирог по деревянному настилу с теплоизоляцией из PIR-плит и механически закрепленной полимерной мембраной в качестве покрытия.

ТН-КРОВЛЯ Практик Клей
Система неэксплуатируемой крыши ТН-КРОВЛЯ Практик Клей представляет собой кровельный пирог по деревянному настилу с теплоизоляцией из PIR-плит и полимерн
Популярность крыш с плоской поверхностью вполне оправдана. Ведь обходятся они дешевле, а также позволяют эффективно использовать верхнюю часть дома. В этой статье мы покажем устройство плоской кровли, при этом будем отталкиваться от того, эксплуатируемой ли она будет или нет. Именно от этого зависит применение определенных материалов и технологий.
Чем примечательна плоская кровля и каковы ее особенности
Плоские крыши по сравнению с традиционными скатными имеют ряд преимуществ.
В частности:
- Экономится материал (ведь площадь у них намного меньше, чем у скатных).
- Экономия теплоизолятора, гидроизоляционного материала и пароизоляционной пленки.
- Времени на монтаж плоского покрытия тратится меньше. Ниже и стоимость монтажных работ.
- Кровлю плоского типа не снесет сильный ветер, а иной раз и ураган.
Используют данный тип крыш для жилых домов, офисных зданий, производственных сооружений. Абсолютно плоскими крыши не делают – надо же куда-то стекать атмосферным осадкам. Как правило, для этого делают уклон около 3 градусов. Уклон может быть сделан при помощи песчано-цементной или керамзита-цементной стяжки.
Основанием для плоской крыши, обычно являются плиты из железобетона или иногда в качестве основания применяют профилированную сталь. Бетонные покрытия могут быть как пустотелыми, так и монолитными. Ну, а само покрытие для крыши делается в несколько слоев.
Сколько этих слоев и из каких материалов они будут выполнены зависит от того, какого типа плоская кровля. Далее мы рассмотрим все возможные типы плоских кровель.
Отличие эксплуатируемой и не эксплуатируемой плоских кровель
Существует два основных вида плоских крыш:
- Эксплуатируемая;
- Не эксплуатируемая.
#1. Эксплуатируемая кровля означает, то что на крышу такого дома можно свободно подниматься, а также размещать на ней что-нибудь массивное. К примеру, там может быть оборудована зеленая зона с цветником, бассейн, летнее кафе, парковка для автомобилей. В общем, использоваться это пространство может для самых разных нужд. Зачастую эксплуатация кровли происходит круглогодично.
Естественно, такая крыша просто обязана иметь под собой достаточно прочное основание. Для этого под гидроизоляционным слоем, который не должен продавливаться находится очень жесткая и прочная основа способная выдержать значительные нагрузки.
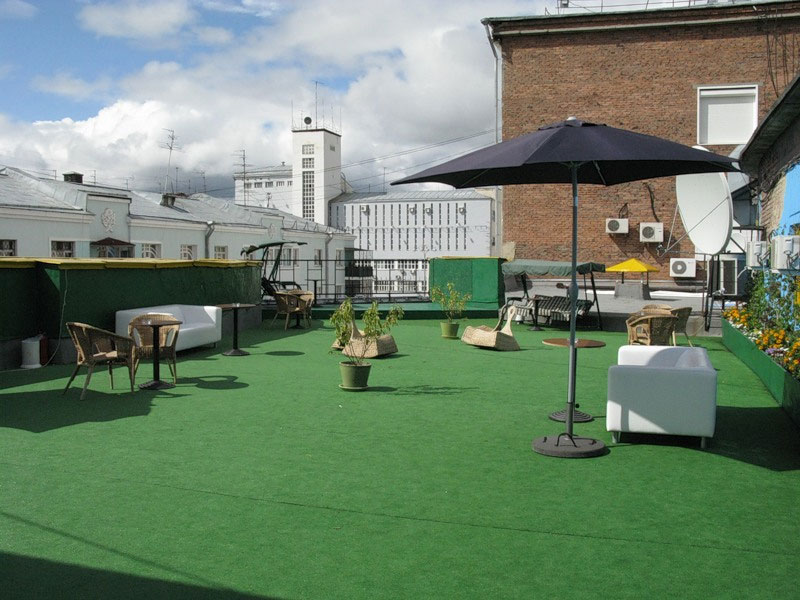
Пример плоской эксплуатируемой кровли, на которой устроена терраса.
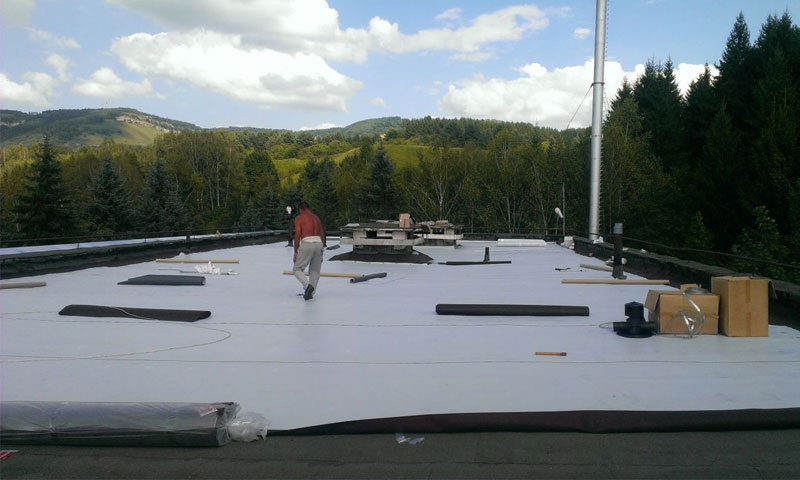
#2. Ну, а второй вариант подразумевает такую крышу, подниматься на которую нужно лишь по мере необходимости, в частности для ремонта. Для устройства этой крыши может использоваться менее жесткое основание, в том числе и профилированный лист.
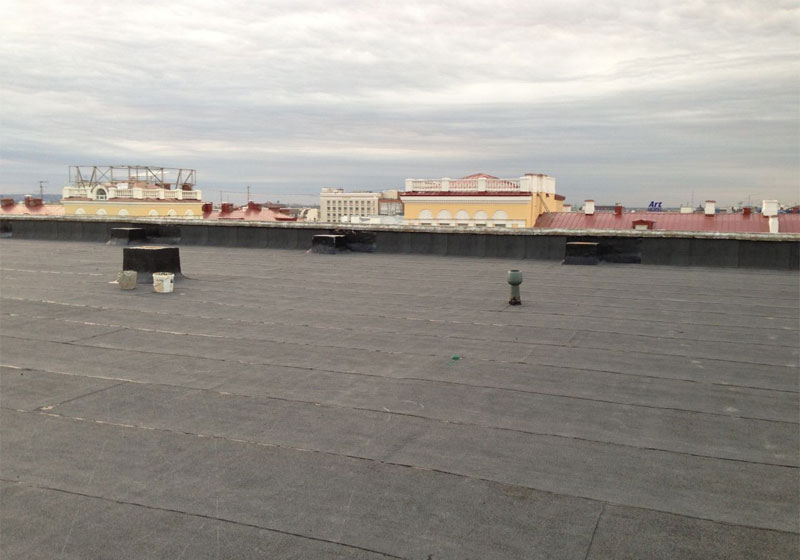
Пример плоской не эксплуатируемой кровли.
Устройство различных типов плоских кровель
Классические или как их еще называют традиционные плоские кровли состоят из бетонного основания на которое настелена пароизоляция. Она призвана защитить утеплитель от влаги, которая может проникать из внутренней части помещения. Пароизоляцию производят при помощи армированной стекловолокном битумно-полимерной мембраной или при помощи специальной паробарьерной пленки.
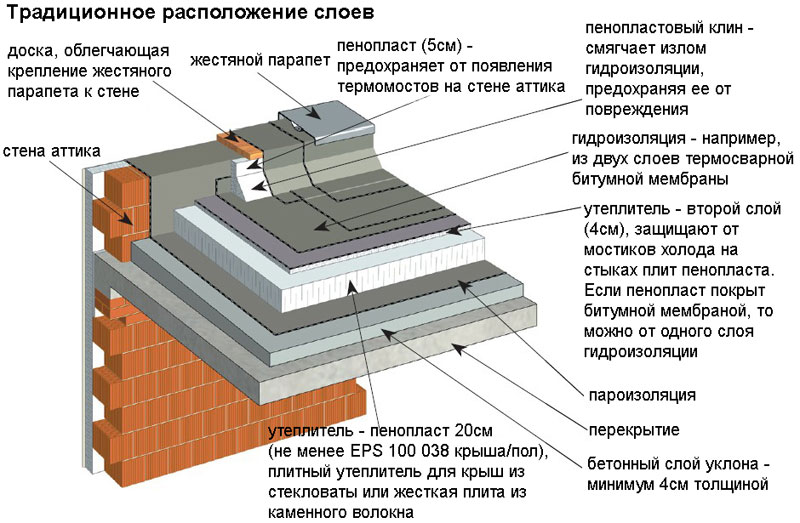
Пароизоляцию настилают таким образом, чтобы с краев кровли она поднималась вертикально на высоту утеплителя. На верх пароизоляции укладывают 1 — 2 слоя утеплителя, который накрывают ковром из битумных наплавляемых материалов.
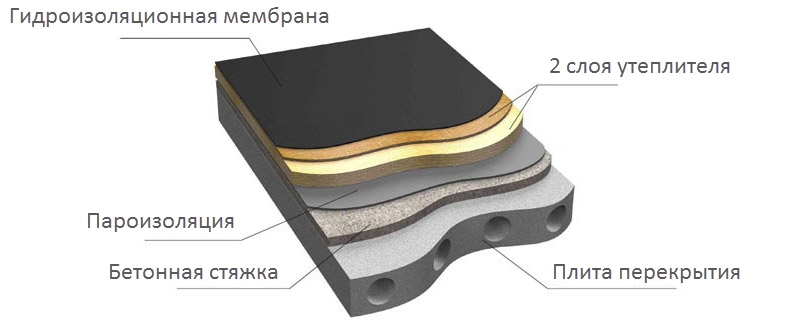
Более подробно устройство и расположение слоев плоской крыши смотрите на схеме расположенной ниже:
Устройство инверсионной кровли
Чуть раньше (лет 10-15 назад) у плоских крыш был существенный недостаток – слой гидроизоляции, укладываемый последним, достаточно быстро разрушался. И снег с дождем и градом этому способствовали, и жара с морозом, и злые ультрафиолетовые лучи солнца. И тогда придумали инверсионную кровлю, лишенную этого недостатка.
Технология устройства плоской кровли данного типа происходит следующим образом: на бетон кладут гидроизоляцию, затем теплоизоляцию (оптимально для этого использовать экструдированный пенополистирол, не впитывающий влагу). Следующим идут покрытие из геотекстиля и дренаж. Верхний слой является защитным, и его часто делают насыпным.
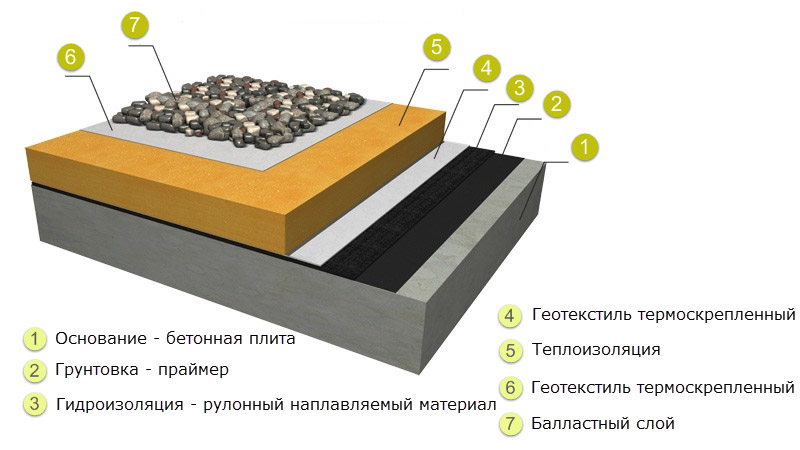
Кровельный пирог инверсионной плоской кровли.
Подобная технология дает следующие преимущества:
- Теперь гидроизоляция хорошо спрятана, поэтому разрушить ее не так-то просто.
- Так как утеплитель расположен сверху, то конденсат не образуется.
- Если что-то повредилось и требуется ремонт, плиты теплоизолятора легко снять, а затем вновь уложить на место.
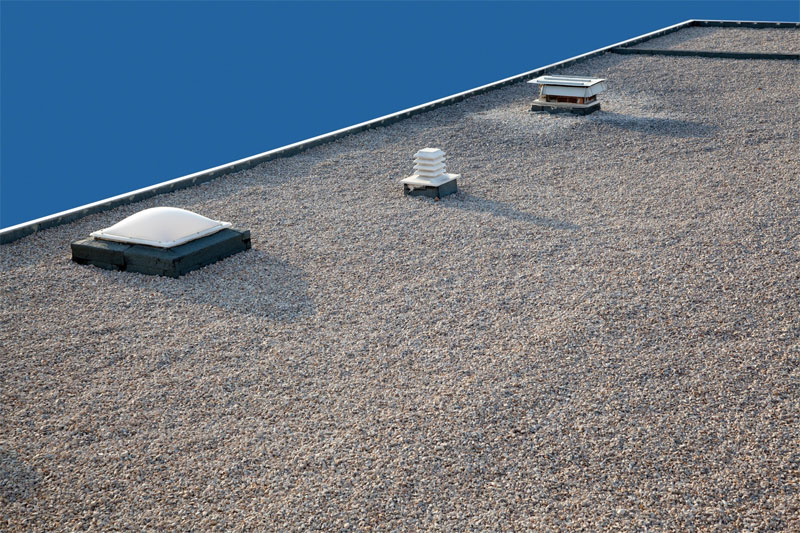
Вот так может выглядеть простая инверсионная плоская крыша в готовом виде.
Устройство дышащей кровли
Не секрет, что именно чрезмерная влажность теплоизолятора сильно ухудшает защитные свойства кровли. Из-за этого на ней легко могут образоваться пузыри и трещины, особенно летом, когда утеплитель, нагреваясь от солнца, активно испаряет воду. Кроме утеплителя влага может присутствовать под слоями старой кровли, в бетонном основании, стяжке. В результате при отсутствии вентиляции покрытие крыши может отслаиваться от ее основания.
Изобретение «дышащей» кровли помогло избавиться от этой напасти – влага в ней может свободно испаряться, уходя наружу. Применяемое здесь устройство плоской кровли из рулонных материалов наплавляемого типа дает отличную герметичность и большой срок службы. Между полосами битумной мастики находится слой утеплителя, а вентилируется крыша кровельными аэраторами, которые устанавливают на ее поверхности, из расчета 1 штука на 50 м2.

Кровельный пирог плоской дышащей кровли.
Плюсы данного типа покрытия:
- Монтируя такую кровлю, старый настил снимать нет нужды (от этого, кстати, и протечки в бетоне могут появиться). Сплавляя старое покрытие, мы, напротив, усиливаем гидрозащиту.
- Уложенный вторым (после старого покрытия) слой для выравнивания поверхности дает прекрасный отток влаги. Ведь этот слой кладется с уклоном.
- Использовать этот метод можно как при новом строительстве так и ремонте старого здания.
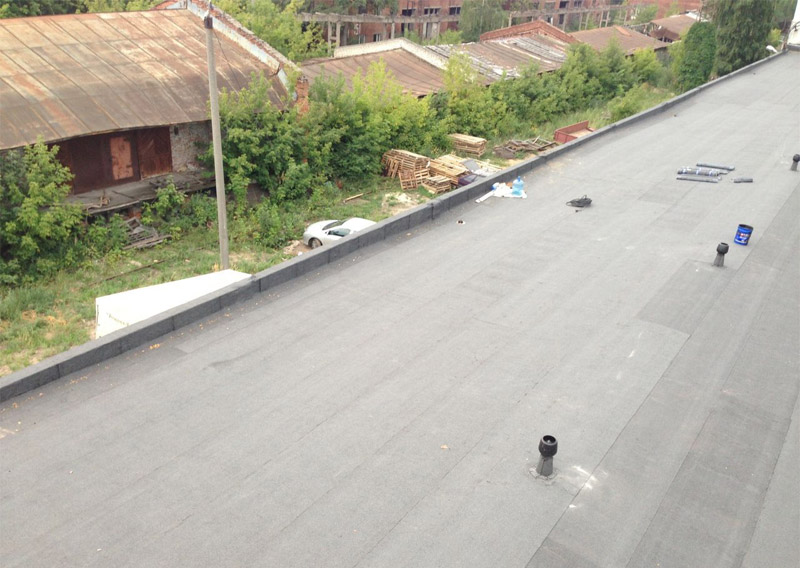
Пример вентилируемой плоской крыши.
Устройство эксплуатируемой кровли
Места в современных городах становится всё меньше, поэтому лишняя парковка или летнее кафе на крыше – отличный выход из положения. Ну, а в собственном доме на эксплуатируемой кровле можно обустроить уютное место для отдыха.
Что касается технологии, то для стандартной террасной крыши характерно наличие железобетонного основания, на котором лежит пароизоляционный слой. Дальше идут теплоизолятор и гидрозащита. А на самом верху имеется террасное покрытие, которое делается очень прочным. Чаще всего для этого используют тротуарную плитку, под которую кладут песчаную подушку (вместо нее возможно применение пластиковых держателей).
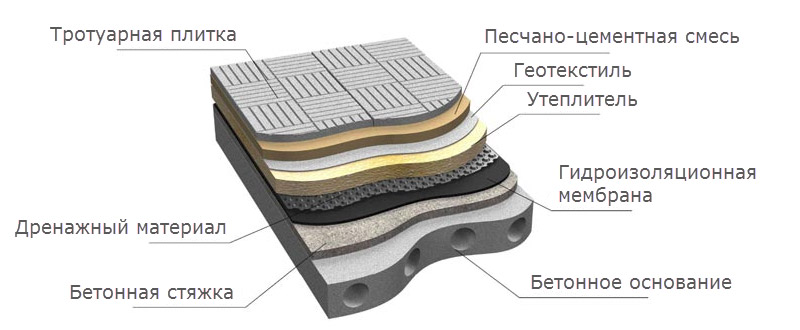
Кровельный пирог плоской эксплуатируемой кровли.
Плюсы эксплуатируемой крыши:
- Дополнительное пространство никому не помещает, а использовать его можно как угодно.
- Воплотив в жизнь интересную дизайнерскую задумку, можно получить на крыше красивейший уголок, где удается расслабиться, отдохнуть в тишине, принять солнечную ванну.
Устройство зеленой кровли
В наших «каменных джунглях» людям катастрофически не хватает зелени. Этот недостаток полностью компенсирует крыша подобного типа. Она может стать симпатичным подстриженным газоном, рядами ярких клумб, а иногда и целым сквериком. Только имейте в виду: решать, что на крыше появится садик или газон, нужно заранее – еще в то время, когда дом проектируется.
Технология, можно сказать, обычная для плоских кровель. Главное – сделать качественную и надежную защиту от воды. Для устройства такого типа кровли на железобетон кладется гидроизоляционный слой, а сверху закрывается слоем теплоизолятора (в данном случае лучше экструдированного пенополистирола ничего еще не придумали). Далее – геотекстиль и дренаж, в качестве которого служит гравий или щебенка.
После этого закрывают дренаж еще одним слоем геотекстиля – так нашу почву не смоет дождь. В самом конце насыпают землю и сажают растения.
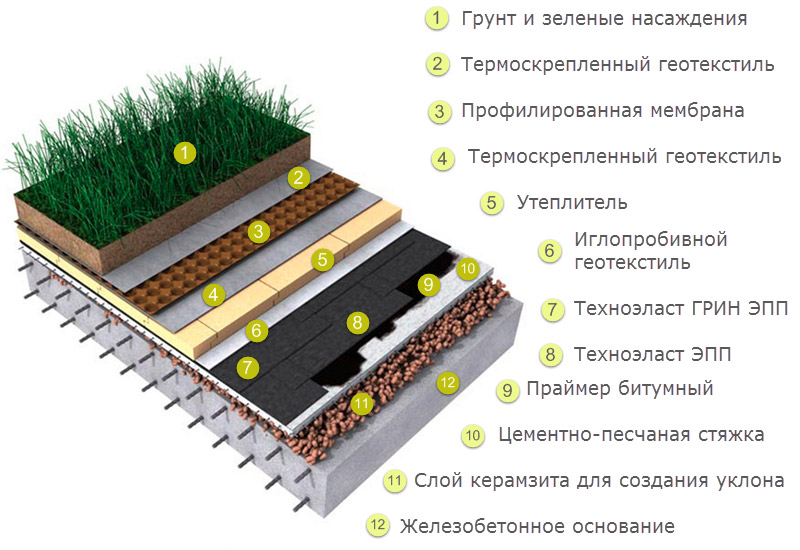
Структура пирога плоской зеленой кровли.
Плюсы подобной крыши заметны сразу – такой зеленый оазис и здоровья прибавит, и душевное равновесие восстановит. Главное – проследите, чтобы соорудили этот оазис профессионалы, а материалы использовались только высочайшего качества. Иначе ремонт в копеечку встанет.

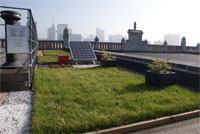
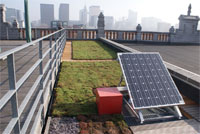
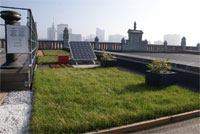
Вот такой замечательный вид может иметь зеленая плоская кровля. Фото: www.buzon-opora.ru
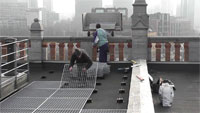
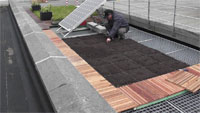
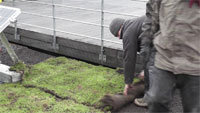
Фото процесса озеленения кровли:

Устройство кровли из ПВХ и ЭДПМ мембран
Поливинилхлоридная (ПВХ) мембрана хороша тем, что благодаря ее применению, потребность в дополнительном гидроизоляционном слое отпадает. А еще она обладает чудесным качеством – термопластичностью. Это значит, что ее швы легко можно запаять с помощью горячего воздуха. ЭДПМ мембрана изготовлена из синтетического каучука, она упругая, прочная и стойкая к ультрафиолету.
В качестве основы под мембранные виды кровли могут использоваться как железобетонные плиты перекрытия, так и металлические профилированные листы. Ну, а теплоизоляцию лучше всего делать из минеральной ваты. Для этого берут либо жесткие плиты этого материала, либо комбинированные.
Поливинилхлоридная мембрана устанавливается прямо на основу через слой утеплителя (его надо уложить отдельно). Крепление происходит в тех местах, где между рулонами материала образуются швы. Крепеж применяют специальный.
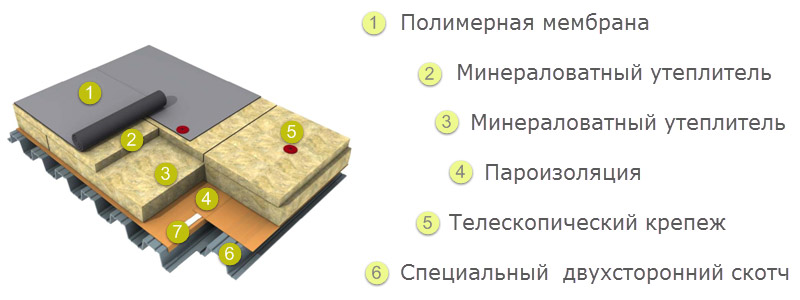
Структура пирога мембранной кровли.
Плюсы мембранной кровли:
- Оба типа мембран (и ПВХ, и ЭДПМ) служат очень долго, при этом легко перенося любые нагрузки.
- Производителями выпускаются мембраны большой ширины, что позволяет легко подобрать рулон материала для кровли сложной формы. Швов при этом получится совсем немного.
- И мороз, и жару подобная кровля переносит отлично.
- Укладка этого материала не представляет сложности – ведь он очень легкий. Поэтому и основание усиливать не требуется.
- Ремонтировать мембраны из поливинилхлорида легко, а после ремонта их свойства ничуть не ухудшаются.
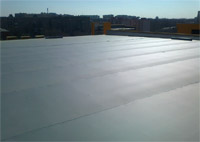
Фото мембранной кровли:

Видео. Устройство плоских наплавляемых кровель
Если вы заметили ошибку, не рабочее видео или ссылку, пожалуйста, выделите фрагмент текста и нажмите Ctrl+Enter.
Главное конструктивное отличие плоской кровли от ее скатного аналога состоит в малом уклоне поверхности, не превышающем 1-3%. Осадки, попадающие на такую плоскость, не скатываются вниз, а задерживаются на ней. И конечно, даже при наличии незначительной трещинки, дают течь.
Можно сказать, что это недостаток плоской крыши. Однако, при выборе подходящих кровельных материалов, отрицательная характеристика превращается в незначительную особенность.
Материалы для кровли плоской крыши нельзя выбирать по принципу «актуальности в новом сезоне». Всяческие модные ондулины и гибкие черепицы не подходят. И вот почему: несмотря на их декоративность и бесспорно хорошие показатели при работе на скатных кровлях, они не способны сформировать сплошной влагоустойчивый ковер. А такой и должна быть плоская кровля: абсолютно герметичной, с минимумом швов – для обеспечения невозможности просачивания влаги под слои кровельного пирога.
Подходят следующие варианты:
- битумные рулонные материалы;
- полимерные мембраны;
- мастики.
Все эти покрытия в составе кровельного ковра являются достаточно плотными, чтобы обеспечить хорошую гидроизоляцию плоской крыши, и достаточно эластичными, чтобы нормально воспринимать температурные и механические воздействия. При этом каждый материал имеет свои особенности – в плане функциональности, способе монтажа, долговечности, стоимости. Поэтому, если вы планируете крыть плоскую крышу, но еще не знаете чем, то предлагаем вам ознакомиться с характеристиками основных материалов.
Это – материалы в рулонах, представляющие собой прочную основу, пропитанную окисленным или модифицированным битумом. Поставляются рулонами, длиной 10-30 м, шириной – около 1 м.
Существуют следующие виды битумных материалов:
- рубероид;
- рубемаст;
- стеклоизол;
- еврорубероид или битумно-полимерная мембрана.
Рубероид
Рубероид можно назвать одним из самых распространенных гидроизоляционных покрытий как в советский период, так и сейчас. По сути, он представляет собой картон, пропитанный битумом. С одной или обеих сторон рубероида имеется защитная подсыпка (песок, асбест, тальк и т.п.). Долговечность кровли из рубероида – 5-10 лет.
Рубероид обладает минимальным водопоглощением, поэтому в его гидроизоляционных свойствах сомневаться не приходится. Он устойчив к атмосферным явлениям и механическим воздействиям, благодаря чему способен выдержать и дождь, и град, и снежные завалы.
К сожалению, рубероид не отличается стойкостью к экстремальным температурным воздействиям: он плавится на жаре (выше 50°C) и трескается на морозе. Поэтому на длительную эксплуатацию, без ремонтов, рассчитывать не приходится. Средний срок «жизни» кровли из рубероида – 5-10 лет. Однако, в защиту этого материала можно вспомнить, что стоит он недорого, а монтаж его достаточно простой. Рулоны раскатывают по кровле и наклеивают на основание битумной мастикой с тщательной проклейкой швов – вот и все.
Рубемаст
Рубемаст, по сути, является тем же рубероидом, но уже улучшенной, более современной его версией. Он также изготавливается на базе кровельного картона, но отличается более толстым битумным слоем на нижней стороне. Благодаря этому, рубемаст характеризуется повышенной пластичностью, он меньше подвержен образованию трещин при механических воздействиях и перепадах температур. Поэтому и срок эксплуатации у него больше, чем у обычного рубероида, — около 15 лет.
Рубемаст относится к наплавляемым материалам. Его укладка выполняется путем расплавления нижнего слоя пропановой горелкой или растворителями.
Плоская крыша | Система плоской крыши ТехноНИКОЛЬ
Вид строительства
Промышленное и гражданское
Коттеджное и малоэтажное
Тип крыши по степени эксплуатации
Неэксплуатируемая
Эксплуатируемая
Тип несущего основания крыши
Деревянное основание
Ж/б основание
Профлист
Класс конструктивной пожарной опасности
К0 (15)
К0 (30)
К0 (45)
Предел огнестойкости
RE15
RE30
RE30-RE90
Кровельный материал
Битумно-полимерный
Полимерный
Метод укладки кровельных материалов
Клеевой
Клеевой/Наплавление
Механическое крепление
Наплавление
Свободная укладка
Теплоизоляционный слой
Каменная вата
Экструзионный пенополистирол
Пенополиизоцианурат
Отсутствует
Комбинированный
Тип основания под кровельный ковер
Стяжка
Теплоизоляция
90000 FLAT ROOF CONSTRUCTION, building, installation 90001 90002 Creating a flat roof can be completed as either a DIY weekend project or by a professional contractor. For first-time homeowners, it’s typical to hire a professional contractor who can complete the flat roof installation for you and offer a full warranty for their work. 90003 90002 Homeowners can choose between several different flat roof designs, and all of them cost approximately the same, but prices can vary according to region and roof size.90003 90002 Generally speaking, the bigger your roof and the sturdier the weatherproofing material, the more you will pay for your design. 90003 90002 90009 Flat roofs can come with a 10-year, 15-year or 20-year warranty. If they are maintained and planned well, though, they may last as long as 25 years. 90010 90003 90002 Some warranties can offer many details on what’s covered for each type of design. 90003 90014 Why do people build flat roofs? 90015 90002 When most people think of roofs for their homes, it’s natural to think of classic pitched (i.e. sloping) roofs. However, there are several reasons why homeowners might need to consider and design a flat roof installation: 90003 90018 90019 Zoning or planning ordinances restrict the height of new construction 90020 90019 Building a pitched roof would obstruct your neighbors ‘views 90020 90019 Building a pitched roof would block sunlight 90020 90019 Creating a home extension results in a structure like a shed that fits right up next to an existing building, leaving no space for a pitched roof 90020 90027 90002 You can think of a flat roof for a garage extension or shed that connects with the main house as an example of a flat roof installation project.90003 90002 Some architectural styles that feature big, boxy designs would be a natural fit for a flat roof. 90003 90014 What types of flat roofs are there? 90015 90002 The two classic types of flat roof designs are the warm flat roof and the cold flat roof. In addition, there’s a third type — the warm flat roof with airflow — that’s essentially a hybrid version of the warm flat roof and the cold flat roof. 90003 90002 There are design differences for each type. 90003 90038 90002 The major difference between the warm flat roof and the cold flat roof has to do with the air flow between the roofing timbers (known as «joists») that help to hold up the roof.90003 90041 90002 In the warm flat roof construction, there is insulation packed into every possible space where air can flow. In creating the cold flat roof, air is allowed to circulate freely between the joists and there is no insulation. 90003 90002 It’s important to keep in mind that installing a flat roof is a largely an either / or proposition: EITHER no air is allowed to circulate OR there is constant airflow throughout. 90003 90002 Problems can arise if air is allowed to move, but not freely.This creates the potential for condensation due to the gaps in temperature; if too much condensation builds up, it can cause the wood to rot away, especially with an outdoor shed. 90003 90002 90009 For that reason, cold flat roof construction needs to keep in mind the need for unblocked airflow. 90010 90003 90014 The 3 most common materials used for flat roof construction 90015 90002 There are several methods and materials for the design of the exterior surface of a warm or cold flat roof. 90003 90002 90009 Material 1: Hot tar and gravel 90010 90003 90002 Also known as the built-up roof (BUR), this type of flat roof features three or more layers of waterproof material, mixed in an alternating fashion with hot tar and a layer of smooth stone-like gravel.90003 90002 As you might imagine, this is the cheapest version possible and good for covering a shed. 90003 90002 90065 90065 90003 90002 90009 Material 2: Modified bitumen 90010 90003 90002 This involves a single-ply rolled roof that creates a protective layer against ice and water. It can be made stronger with a mineral-based surface. To guarantee the material stays secure, most of these materials come as peel-and-stick systems that are easy to apply. 90003 90002 90075 90075 90003 90002 90009 Material 3: Rubber membrane 90010 90003 90002 Also known as EPDM (ethylene propylene diene monomer), this is natural rubber — the kind you might find on a car tire or an inner tube.It’s durable, and can be fastened to the roof with fasteners and glue. This is probably one of the easiest versions for a DIY project. 90003 90002 90085 90085 90003 90014 A list of materials for flat roof installation 90015 90002 Depending on the type of roof you’ve chosen — either warm flat roof or cold flat roof — you’ll need to gather a number of important materials to build a flat roof. 90003 90002 In addition to basic tools such as a drill, utility knife and measuring tape, you’ll need the following basic materials, knowledge of local regulations, and a set of detailed instructions: 90003 90018 90019 Roofing timber (known as «joists» ) 90020 90019 Steel joists (known as «steels») 90020 90019 Rubber EPDM membrane (or other exterior covering) 90020 90019 Water-based adhesive 90020 90019 Plywood 90020 90019 Foam with fiberglass backing 90020 90019 Copper flashing 90020 90019 Insulation (for the warm flat roof only) 90020 90027 90014 The basic construction process 90015 90002 To build a flat roof, you’ll want to have a thorough understanding of how the process of constructing the flat roof works and the different methods available.That will help you remember certain factors and details to build the best possible flat roof. 90003 90002 Having a manual for warm flat roof construction with details and a summary of rules to follow helps. 90003 90002 90009 The basic construction of a flat roof starts with roofing timber that is laid across two upright items, usually two walls. 90010 90003 90002 For additional stability, you can also use steel joists that are built into one or both of the walls. This will give additional stability to the roof structure.90003 90002 Then, this roofing timber will be placed on top of the steel joists, which are built into the walls. In some cases it is actually cut into the steel, but in most cases it will be simply laid on top of the steel joists. 90003 90038 90002 Depending on the size of the roof, the joists are placed a specified distance apart to minimize the weight-bearing load on any of them. 90003 90041 90002 You can often consult an online chart to find the optimal distance based on the width and span of the roof.Generally speaking, the bigger the roof, the more joists you will need to hold up the roof. 90003 90002 You will then add a plywood covering over the joists, what some home professionals refer to as the «decking.» Again, the width of the decking will depend on a number of factors that will impact how sturdy the roof is. 90003 90002 You want enough to protect the structure, but not too much weight. You will also need a frame for a slight incline. This frame is important. 90003 90002 The next step is to think about weatherproofing and waterproofing the boards that are laid across the joists.The classic option is EPDM rubber (or a combination of rubber with felt or fiberglass). 90003 90002 This is used to cover the boards and make them waterproof. With some sealant, you can create a very safe covering. You can find more details in a flat roof construction manual. 90003 90038 90002 In order to make the roof as stable and strong as possible, you will also want to give some thought as to how the decking and the joists will fit together. 90003 90041 90002 One classic approach is to use what is known as a «tongue and groove» fitting, in which a slight cut out in one joist is placed into the other.This helps to secure them closely together, almost as if they are «locked» together. 90003 90014 The 8-step process for DIY installation 90015 90002 Below is an easy-to-follow manual for building flat roofs, including a guide to flat roof framing and installation with plenty of details and specifications about the frame. If you want a DIY flat roof, here are the steps to follow. 90003 90002 90009 Step 1: Frame the roof 90010 90003 90002 One important — and perhaps not so obvious fact — is that a «flat roof» is not actually flat.That would be impossible, since a flat roof would receive so much weight from water buildup and snow buildup that it would not be long-lasting. 90003 90038 90002 So every flat roof actually has a gentle rise and fall created by a «frame» that enables water to run off the roof naturally, and thus avoid any problems caused by weeds or other plant matter starting to grow on the roof. 90003 90041 90002 Flat roofs are always built at a slight incline, at least 1/8 inch per foot. Some roofs actually slope in several directions, ensuring optimal water runoff.This will help you create a flat roof framing plan. 90003 90002 When framing a flat roof, you will need to create a slight incline. You can do this with a foam layer that exactly fits your roof. 90003 90002 For very small roof jobs, you can achieve the same effect by taking 2x4s and converting them into long wedges that you can then nail to the joists. These will be larger and closer together than on a pitched roof in order to handle any snow or water. 90003 90002 90167 90167 90003 90002 90009 Step 2: Add the plywood 90010 90003 90002 Once you’ve added the framing, it’s time to add a layer of 5/8-inch plywood sheathing.You will want to make sure that there is at least a 1/8-inch gap at all the joints to allow for contraction, expansion and the natural movement of the roof. 90003 90002 90177 90177 90003 90002 90009 Step 3: Add the underlayment 90010 90003 90002 You must now create a soft, protective base for the rubber. You can do this with an IsoBoard, which is a piece of 1/2-inch-thick rigid foam with a special fiberglass backing. You can cut this IsoBoard easily with a knife. 90003 90002 Once you have the right size, you can secure it to the plywood sheathing with screws and steel washers.You will want to make sure that all the pieces fit snugly against each other. This is important for the installation. 90003 90002 90189 90189 90003 90002 90009 Step 4: Create the corners 90010 90003 90002 During the installation, you must ensure that no water is able to pool and collect at any inside corners of the roof, especially if the roof includes a parapet, which is a very short wall common around flat roofs. 90003 90002 To prevent any pooling, you will want to use 2x4s that you can cut into the proper size.You can then screw them into the joint between the roof and the wall to create a gradual transition. 90003 90002 90201 90201 90003 90002 90009 Step 5: Complete the dry-fit process 90010 90003 90002 Now comes the time in the installation when you put down the rubber. So first make sure there are no loose items or debris on the roof. 90003 90002 Then take the rubber, which usually comes in big 10-foot rolls from the local hardware or home improvement store. You can cut these rubber rolls with a utility knife.90003 90002 90009 The goal is to cut a piece that is big enough to cover the roof as well as leave an additional 9 inches around the entire roof. 90010 90003 90002 You will then take the huge piece of rubber, spread it carefully in place, and then take the additional overlap and fold it back on itself. 90003 90002 90219 90219 90003 90002 90009 Step 6: Secure the rubber with glue 90010 90003 90002 You have two elements that need to be glued together — the folded-over rubber and the IsoBoard.You’ll need to spread the glue over both, preferably with a paint roller on an extension pole. 90003 90002 90009 This glue is going to bond almost immediately, so ensure you have both pieces positioned correctly. 90010 90003 90002 After the glue seems to be almost dry, you can finish the spreading process so there are no wrinkles. 90003 90002 Now it’s time to go back over the roof and make sure there are no air bubbles. Any extra edges you can glue to the roof and wall. You want a very snug fit.90003 90002 90237 90237 90003 90002 90009 Step 7: Finish off any edges 90010 90003 90002 At any inside vertical corners, you can cut and overlap the EPDM rubber, and then use rubber adhesive to glue it down tightly. 90003 90002 Then it’s time to seal this seam. And, to prevent the vertical sections from peeling off the walls, you may need to screw on metal brackets known as termination stops. You can cut off any excess above the brackets for a better fit. 90003 90002 90249 90249 90003 90002 90009 Step 8: Add a copper flashing 90010 90003 90002 As a last step of installation, you can nail down a custom lead-coated copper flashing over the front edges of the roof, then glue down a 12-inch strip of uncured rubber over the flashing’s top nail edge.90003 90002 90259 90259 90003 90014 Other factors to keep in mind for your flat roof 90015 90002 Of course, when I comes to flat roof construction details and specifications, you’ll have to remember certain regulations about building a flat roof. Many of these flat roof building regulations pertain to the ability of the roof to withstand quite a bit of weight. 90003 90002 That’s because water puddles, if allowed to form on the roof, can generate a lot of weight. Over time, that could lead to sagging structures or the rotting of your roof entirely.You can find more details on these regulations and specifications in a manual. 90003 90002 There’s also the matter of the best way to protect your roofing plywood decking from the impact of weather. Some regulations will also address this factor. 90003 90002 That’s why it’s vital to keep in mind weatherproofing materials that can act as an additional layer of protection. Once a roof has started to rot — such as from condensation buildup — it is very difficult to repair 90003 90014 Conclusions 90015 90002 There are a number of pros and cons for any type of flat roof — either warm or cold — that you may decide to install yourself with the help of a manual.(Especially a flat roof construction manual). 90003 90002 Just keep in mind basic principles, the regulations to follow, and understand the trade-offs involved in using specific materials for a DIY flat roof. 90003 90002 While it’s important to keep down the costs of any DIY roof project, it’s also important to have the highest-quality materials that will ensure that the roof lasts as long as possible. 90003.90000 COMPOSITION SHINGLE ROOF 90001 90002 A roof does not just serve to keep the elements and weather at bay; it is also a very important structural component of any building because it provides protection for the entire structure. 90003 90002 Selecting the right roof design can make a big difference in the final outlook of your building. 90003 90002 If you are looking for a roofing system that is sturdy, long lasting and at the same time cost effective, your best bet is a composition shingle roof.90003 90008 WHAT IS A COMPOSITION SHINGLE ROOF 90009 90002 A composition shingle has an outer layer made from an asphalt composition and the underneath part of the shingle, which lies against the roofing felt on the roof sheathing, is made of a fiberglass matting. The exposed side is often coated with colored granules. 90003 90002 Composition shingles are one of the most preferred choices for roofing because of the combination of the properties of asphalt and fiberglass, such as durability and lightweight respectively, making them suitable for most roofing applications and climatic conditions.90003 90002 90015 90015 90003 90002 A Composition shingle roof or three-tab asphalt shingle is suitable whether you are undertaking a new construction or remodeling an existing one, because it adds to the overall quality and aesthetic beauty of your building while being affordable. 90003 90002 This is in addition to its ability to hold up under different weather conditions over a long period of time. A Composition shingle roof’s lifespan is between 20 to 30 years. 90003 90008 ADVANTAGES OF A COMPOSITION SHINGLE ROOF 90009 90002 Low initial cost: The cost per square foot of composition slate roof shingles is lower when compared to other roofing options.90003 90002 Consequently, the framework required to hold the shingles is cheaper, thus making the overall roofing cost quite easy on the pocket. Additionally, the ease of installation further helps to reduce the cost of installation as less time is spent on the project. 90003 90028 90029 90030 Durability: 90031 A Composition shingle roof is not easily damaged by weather variations and the design does not allow for moisture buildup. 90032 90029 90030 Aesthetics: 90031 With a composition shingle roof, you have an array of designs and colors to suit your style and enhance the beauty of your home.Although lightweight, their weight carrying capacity is high and you can walk on them without any noise. 90032 90029 90030 Low maintenance cost: 90031 Once the structure is set and all the shingles are well seated, composition shingle roofs require very little by way of maintenance as they remain solid through rain or shine. Cracked or broken shingles may come as a result of a storm at the early stages, but these can be easily replaced without affecting the entire roofing structure. 90032 90041 90008 COMPOSITE ROOFING VS ASPHALT SHINGLES 90009 90002 The basic difference between composite roof shingles and asphalt shingles is in the under layer.The outer layer and matting of an asphalt shingle is made up of asphalt components. 90003 90002 On the other hand, a composite roof shingle has outer asphalt covering, while the underneath of the impregnated felt is made of fiberglass. 90003 90002 As a result, composite roof shingles are lighter in weight and therefore easier to load or lift up to heights and would require a less bulky framework for installation. Also, composite roofing has better fire retardant properties and tends to last longer than asphalt shingles.90003 90050 90002 Composite shingle roof life expectancy is typically higher than that of asphalt shingles with manufacturers offering warranties of up to 30 years. 90003 90053 90002 This makes them more cost effective in the long run. Also, unlike asphalt shingles, composite shingles offer a wide range of design and color choices. 90003 90002 The advantage that asphalt shingles have over composite roofing is in their installation flexibility and better ability to absorb water. 90003 90002 Both composite roofing and asphalt shingles are made with non-reusable materials.However, the component materials of asphalt shingles are more environmental friendly than that of composite shingles. 90003 90008 HOW TO INSTALL COMPOSITION ROOF SHINGLES 90009 90002 Described below is the racking method of installing composition roof shingles: 90003 90028 90029 90030 Time Frame: 90031 Three skilled workmen would typically require 2 days to completely shingle a roof spanning 1,500 square feet. 90032 90029 90030 Tools needed: 90031 A pneumatic nail gun for fastening the shingles Including a tape measure, roofing hatchet, a chalk line, a straightedge, a roofing square, a pry bar, a utility knife, caulking gun and tin snips 90032 90029 90030 Materials required: 90031 Shingles, long roofing nails, roofing cement, and flashings 90032 90041 90002 Firstly, prepare the roof by Installing underlay, drip edge, and valley flashing.90003 90002 90081 90081 90003 90002 Load the roof, preferably with a boom with the shingles whille being careful not to allow them slide downwards. Either spread the shingles on the roof for easy reach or stack them near the ridge. 90003 90002 Snap horizontal chalk lines so that you maintain a straight course. Then snap lines for every course or every other course. 90003 90002 Install a continuous starter strip or full-sized shingles, which are simply turned downside up. Often, however, a starter course is made of cut shingles.90003 90002 Place the shingle upside down on a sheet of plywood and use a straightedge to cut it 7 inches wide; you will use the portion with no tabs. 90003 90002 Beginning at one end, place the starter shingles downside up with the self-seal strip near the bottom with the top aligned with the chalk line and the bottom flush with the bottom of the underlayment. 90003 90002 90095 90095 90003 90002 Attach each starter shingle by driving three nails along its top edge. Fastening along the top edge prevents the nail heads from being exposed.90003 90002 To avoid ending up with a narrow strip of tab along one of the rakes, lay out a full course of shingles and adjust their position as needed. 90003 90002 To attach a shingle, align it with the layout line and drive nails 1/2 inch above the cutout slots (including the half slots at each side). Drive a nail at one end first and afterwards, drive the others. 90003 90002 For a racking or mid-roof pyramid layout method, snap two vertical lines (called bond lines) near the center of the roof, the appropriate distance apart.90003 90002 Check them with a framing square or measure so the lines are parallel with the rake ends. You can use the factory edges of a half-sheet of plywood as a guide. 90003 90002 To shingle around a dormer or other obstruction, install shingles all the way up and run at least one course past the obstruction. The bottom of these courses must be nailed higher than usual so you can slip shingles under them later. 90003 90002 Now, you can snap a new bond line to align the shingles on the other side.90003 90002 Install four or five courses of shingles along the bond lines in an alternating pattern. Take care that the shingles are correctly aligned with consistent reveals. 90003 90002 Later, you will need to lift up the outermost ends of the shingles on each side in order to slip in a shingle, so do not drive the outermost nails now 90003 90002 Starting at the racked shingles, fill in the courses. Align the shingles with the horizontal lines and nail them in place. Note: In areas with high winds, it is common to drive two nails above each cutout line.90003 90002 Shingles often have small cuts on the top and sides that can be used as guides for horizontal and vertical alignment. Use these whenever there is no layout line. Also, roofing hatchets and some roofing nailers have adjustable guides. 90003 90002 To apply flashing at a wall, slip pieces of step flashing under the siding where a wall is perpendicular to the roofing. Apply a flashing piece, then a shingle, then flashing, as you would apply step flashing for a chimney. 90003 90002 If the roof meets a wall that is parallel to the shingles, roof up to the wall, then slip a long, continuous piece of flashing under the siding and on top of the shingles.90003 90002 At a peak or hip, shingle all the way up the first side until the reveal portion of the shingles is within 4 inches of the peak and cut the shingles just below the ridge. Shingle the other side and allow these pieces to overlap the ridge by no more than 4 inches. 90003 90002 90127 90127 90003 90002 To cut ridge caps, turn shingles upside down and cut off single tabs. Angle the cuts slightly so the non-reveal portions will not be visible when the caps are installed. 90003 90002 Make a cut on the backside, then bend and break the shingle.Using a 5-inch reveal, estimate the number of caps needed. Prepare the ridge by snapping chalk lines 6 inches on each side. 90003 90002 Install ridge caps along the lines, leaving a 5-inch reveal. Drive the nails about 1-1 / 2 inches from the sides and just below the self-sealing strip. Shingle to the middle of the ridge, then start from the other end. 90003 90002 Where the ridge caps meet, install a 5-inch-wide strip. Cover nail heads with dabs of roofing cement. 90003 90002 If you have a hip that runs into the main roof, cover the area with WSU when you are installing the sheathing; cut the WSU so it lies flat at all points.Then cover the resulting V-shape notch with another piece of WSU. When you install the shingles, leave one shingle unnailed so you can later slip a ridge cap under it. 90003.90000 Advantages and Disadvantages of Flat Roofing 90001 90002 90003 90004 90002 Flat Roof: Advantages and Disadvantages 90004 90007 Of all the different roof types for homes and buildings, one of the most controversial is the flat roof. Used commonly on large buildings and outbuildings, the flat roof has its own special set of needs and challenges. If you’re considering this type of roof for your building or residence, make sure you understand the advantages and disadvantages it can bring.90008 90009 90010 90011 90012 Get Started 90013 90012 90007 Request Your Free Quote! 90016 Residential & Commercial Roofing, Siding, Gutters, Windows and Doors. 90008 90013 90019 90020 90021 90022 Flat Roof Advantages 90023 90007 By far the biggest advantage of using a flat roof is the expense. From the initial building and installation to the materials most often used to cover the roof, flat roofs are fairly cheap. Many types of material used for installation run about.80 a foot, which makes a flat roof extremely affordable both for the initial installation and the maintenance and upkeep. 90008 90007 Another advantage to using a flat roof is the fact that you can now make use of the space once the roof is done. Get your air conditioning units up off the ground and put them on the roof. Install solar panels on the roof that are less obvious from the curb. Plant a roof top garden or design a living roof. The possibilities of how you can use a flat roof are nearly endless, and this is by far one of the greatest benefits to using one.90008 90007 Going hand in hand with the last advantage is the fact that with a flat roof, you have the ability to have a more versatile interior space as well. Finished attics and the use of a top floor apartment become more readily available without the sloped walls that a traditional pitched roof would produce. This makes a nice option for homes where the maximum amount of interior space is needed. 90008 90007 Finally, flat roofs are generally more accessible than sloped roofs. So cleaning your gutters, making repairs, and installing things like satellite dishes or solar panels become easier and less expensive to do as well.90008 90022 Flat Roof Disadvantages 90023 90007 The biggest disadvantage to installing a flat roof is the drainage, or lack thereof. Flat roofs do drain, but not nearly as efficiently as a roof with any kind of pitch. Therefore water has a tendency to puddle and remain on the roof, which could lead to the roofing material breaking down or to eventual leaks, particularly along the seams. 90008 90007 The second disadvantage is the lack of roofing material options. The vast majority of flat roofs use a type of rolled roofing; rubber, EPDM, TPO, or bitumen.These are all relatively inexpensive materials and easy to install, but most of them have a limited lifespan of 10 to 15 years. Rubber shingles are available that can be installed in conjunction with rolled rubber roofing, and some new materials such as polycarbonate roofing and PVC roofing are becoming available that may last longer and give some style options, but these come at a higher price, and lack the kind of history that can help predict how long they will last. 90008 90022 Consider a Flat Roof 90023 90007 Flat roofs may not be the most glamorous option for homes and buildings, but they do have their advantages as well.Pay attention to these and the drawbacks when making your decision to ensure you get the best roof for your building. 90008 90009 90010 90011 90012 Get Started 90013 90012 90007 Request Your Free Quote! 90016 Residential & Commercial Roofing, Siding, Gutters, Windows and Doors. 90008 90013 90019 90020 90021 90055 90007 90057 Was it helpful to you? 90058 90008 90060 Loading… .90000 2020 Flat Roof Guide: Installation Cost, Materials, Pros & Cons 90001 90002 A flat roof looks and performs very differently compared to a traditional sloped roof such as shingles, tiles, or metal. While its not designed to be a water shedding system, because it has a low pitch, flat roofing can still protect your home from leaks and severe weather. Today, there is a wide range of cutting edge flat roof systems that offer distinct pros and cons, longevity, and of course, price. 90003 90002 90005 In this guide: 90006 90003 90002 Flat roofing materials 90009 Cost of installation 90009 Materials prices 90009 Installation options 90009 Longevity 90009 Durability 90009 Importance of insulation 90009 Maintenance and repair 90009 Unique applications and benefits 90009 Energy efficiency 90009 Environmental impact 90003 90020 Types of flat roofs 90021 90002 90003 90002 A classic flat roof is either almost completely level or has a very slight pitch of 3 in 12 inches or less.90003 90002 Most flat roofs are typically not as long lasting or durable as sloped ones, because the latter shed snow and rain a lot quicker. However, over the last few decades new and advanced materials have been developed. They are highly durable, energy efficient and can compete with traditional roofs on longevity. 90003 90002 Here are three general types of systems you can put on a flat roof: 90003 90002 1. Single — Ply 90009 2. Built-up 90009 3. Spray-on / paint-on 90009 90003 90035 Average Flat Roof Cost: 90003 90037 90038 90039 90002 Low End 90003 90002 $ 6815 90003 90044 90039 90002 Mid Range 90003 90002 $ 8769 90003 90044 90039 90002 High End 90003 90002 $ 11211 90003 90044 90057 90038 90059 90002 See Costs in Your Area! Start Here — Enter Your Zip Code 90003 90044 90057 90064 90020 Single-ply roofing 90021 90002 90005 EPDM 90006 (Ethylene Propylene Diene Monomer), 90005 PVC 90006 (Polyvinyl Chloride), and 90005 TPO 90006 (Thermoplastic Olefin) are the most popular single-ply membranes.90003 90002 Today, these three roofs are most frequently used in both commercial and residential construction. It important to know that they are NOT equal in quality and longevity. Each has very different formulations, durability specs and cost. 90003 90002 Single-ply means just one layer of membrane as a waterproofing and weather surface. All membranes range in width from 6-18 feet. The ones most commonly used are around 10 feet. The average thickness ranges from 45-90 mil. It is typically recommended to install a membrane that is at least 50 mil thick.90003 90079 Pros 90080 90002 — Solar reflective and energy efficient 90009 — Some materials can be recycled 90009 — Long lasting: high end membranes last up to 30-40 years 90009 — Systems with hot air welded seams (PVC and TPO) are water proof 90009 — DIY installs and repairs are possible for EPDM rubber 90009 — Resistant to inclement weather: snow, ice, rain, wind, fire 90009 — Can be used a roof top garden or patio 90003 90079 Cons 90080 90002 — Membranes that have seams are prone to leaks (EPDM) 90009 — Exterior penetrations, such as pipes, chimney, HVAC equipment can cause leaks without proper flashing work 90009 — Require expensive expert installation and equipment (PVC and TPO) 90009 — Can be punctured by a sharp object, falling tree branches, etc 90003 90079 TPO vs PVC 90080 90002 There is big competition between TPO and PVC membranes, and heated debate about which is better.90003 90002 Today, PVC roofing is considered the most durable. It is especially formulated to remain intact in a wide variety of adverse weather conditions (rain, snow, wind, sun, hot and cold temperature fluctuations). 90003 90002 Moreover, what makes PVC so strong is the fact that the top and bottom ply of the membrane have almost equal thickness. 90003 90002 To compare, TPO has questionable durability, as there is no consistent formula among manufacturers, who are experimenting to make it as durable, but also cheaper than PVC.As with any product, we all know what happens when you try to slash prices by lowering the quality of materials. 90003 90002 One factor that compromises TPO’s strength is the fact that the top ply (weathering surface) of the membrane (which ensures durability) is actually thinner than the bottom ply. In most products the ratio is 40/60. 90003 90002 Lastly, most TPO roofs offer weak resistance to heat and solar overload. 90003 90002 Prices 90003 90002 Low End 90003 90002 Mid Range 90003 90002 High End 90003 90002 Materials 90003 90002 $ 3827 90003 90002 $ 4502 90003 90002 $ 5718 90003 90002 Total Cost 90003 90002 $ 9913 90003 90002 $ 11662 90003 90002 $ 14811 90003 90002 See Costs in Your Area! 90003 90002 Start Here — Enter your zip 90003 90009 90020 Built-up roofs 90021 90002 Built-up roofs are manufactured using built-up layers of either tar-saturated paper and liquid tar with gravel, asphalt, rolled asphalt, or modified bitumen.As the roof is installed, more and more layers are added to increase durability and longevity, hence the name «built-up». 90003 90002 Among them are: 1. Tar and Gravel 2. Modified Bitumen 3. Rolled Asphalt 90003 90002 All of these are considered outdated by modern construction standards. They are almost never installed on large commercial properties, but continue to be installed on some residential homes, due to their low cost. 90003 90002 You should keep in mind that any type of built-up material requires a positive roof slope (at least 1/12 inches).90003 90002 90150 90151 90003 90079 Pros 90080 90002 — Relatively cheap materials and installation costs 90009 — Very low maintenance 90009 — Resistant to foot traffic, UV rays and punctures 90003 90079 Cons 90080 90002 — Difficult to locate the source of leak 90009 — Short service life of 10-15 years 90009 — Costly repairs that often do not take care of the problem 90009 — Very poor energy efficiency 90009 — Not environmentally friendly 90009 — Lacks flexibility in cold temperatures and is not recommended for installs in the Northern states 90009 — Harmful fumes and vapors are emitted during the install of BUR 90009 — Very heavy material that often requires structural reinforcement (BUR) 90003 90009 90020 Spray-on / paint-on roofs 90021 90002 There are two main types: 90003 90002 90005 1.Spray foam insulation 90006 (sprayed directly onto the roof deck and then coated with acrylic or urethane coating, as well as a layer of crushed stones / sand. 90003 90002 90005 2. Roof coatings 90006 (manufactured for existing roofs and used to extend their service life by 10-15 years). They are typically installed on top of single ply, modified or low slope metal roofs. 90003 90079 Pros 90080 90002 — Seamless installation 90009 — SPF foam can conform to all roof shapes and sizes, including irregular ones 90009 — Offers good insulation and energy efficiency (high R-value) 90009 — Does not have seams, which makes the coating waterproof 90009 — Requires minimal maintenance 90009 — Can be applied on top of existing roof, eliminating the need for costly tear-off and disposal 90009 — Can last up to 40 years if properly installed 90003 90079 Cons 90080 90002 — Very costly.For example, silicone coating is one of the most expensive materials you can install 90009 — Complex installation process that requires a lot of technical knowledge. Should only be done by and experienced pro. 90009 — More potential for system failure due to poor installation and contractor errors 90009 — SPF can only be installed during specific weather conditions (very narrow range of temperatures and humidity levels) 90009 — SPF is usually specified for commercial buildings, not residential homes 90009 — Spray foam roofing emits harmful fumes during the install 90003 90020 Cost of installation 90021 90002 The average cost to replace a flat roof on a 1,500 sq.ft. home ranges from 90005 $ 8,000-11,000 90006, depending on the material you use and the complexity of installation. 90003 90002 Installation prices quoted below are for very simple roofs, over 1,000 sq. feet. Your total price will vary depending on many variables, such as roof size and complexity, geographic region, etc. Any additional insulation and details will increase your total labor charges. 90003 90002 PVC membrane: $ 6.50 — 7.50 + per sq. ft. 90003 90002 EPDM rubber: $ 5.50 — 6.50 + per sq. ft. 90003 90002 TPO roofing: $ 6.0 — 7.0 per sq. ft. 90003 90002 Modified bitumen and rolled asphalt roofs: $ 5.50 — 6.50 + per sq. ft. 90003 90002 Spray Foam Roofing: $ 4.5 — 7 + per sq. ft. 90003 90002 You can use our Flat Roof Calculator to quickly and accurately estimate the cost of replacement. 90003 90020 Material prices 90021 90002 In general, materials used on flat roofs cost less than ones used on sloped ones. 90003 90002 EPDM is $ 1.50 per sq foot, making it the cheapest single ply membrane.90003 90002 TPO is $ 1.70 per sq foot 90003 90002 PVC is $ 1.90 per sq foot 90003 90002 Modified bitumen and rolled asphalt roofs cost $ 1.30-2.20 per sq foot, depending on the number of plies. 90003 90002 Tar roofs are installed extremely rarely, have to be special ordered and therefore pricing is not readily available. 90003 90002 Spray foam roofing costs $ 1.65-2.25 per square foot for a 1.5 inch layer of foam. 90003 90002 Note, that all the prices quoted above are for materials ONLY, and do not include insulation.90003 90037 90241 90038 90039 Install Roof Shingles 90002 $ 4872 90009 Average price 90003 90044 90039 Install Metal Roof 90002 $ 10253 90009 Average price 90003 90044 90039 Install Flat Roof 90002 $ 8257 90009 Average price 90003 90044 90057 90038 90059 90002 See costs in your area Start Here — Enter Your Zip Code 90003 90044 90057 90265 90064 90020 Installation types 90021 90002 Single ply roofing is either fully adhered or mechanically attached.90003 90002 90005 The fully adhered method 90006 consists of gluing the membrane directly to insulation, or to the substrate. 90003 90002 90005 The mechanically attached method 90006 consists of fastening each row of membrane to the roof deck with screws and barbed plates. Fasteners are typically spaced 12 inches O.C. 90003 90002 The most common problem with the fully adhered installation (typically EPDM rubber) is that the seams are poorly glued, there are bubbles in the membrane, and leaks inevitably result.90003 90002 Torching is used in the installation of Modified Bitumen, and therefore can be a fire hazard to your home or commercial property. 90003 90002 Today, EPDM is the most commonly installed single-ply membrane both for residential and commercial applications. It is so popular because no special equipment is needed to complete the install. 90003 90002 We strongly recommend that you find a contractor who specializes in single ply roofing to ensure that there will be no leaks after installation.Many customers make the mistake of hiring contractors specializing in sloped roofing (asphalt shingles), who have little to no experience in this field. 90003 90002 It is best to do a full tear-off before proceeding with the installation, to eliminate any moisture and replace any rotted substrate. 90003 90020 Longevity 90021 90002 90003 90002 The visual above displays the most common signs you would notice when your roof starts to get really old. These include: 90003 90002 — Thinning and blistering 90009 — Cracking 90009 — Contractions or pulling 90009 — Flaking 90009 — Slice marks 90009 — Grease and dirt built-up that can no longer be removed 90003 90002 PVC is considered to be the longest lasting.Because of heat-welded seams, it remains flexible throughout its lifetime and can also withstand thermal movement. 90003 90002 A PVC roof can last well over 30 years. Manufactures offer a 25 year warranty for commercial installations and some offer LIFETIME warranty for residential (IB, Flex, Fibertite). Here is a good article on real world performance of PVC roofs: http://www.coolflatroof.com/flat-roof.php 90003 90002 EPDM lasts only about 10-15 years. Even though manufacturers offer warranties that are up to 40 years for commercial roofing (none for residential), its important to be aware that these warranties do not cover failing seams or ponding water.Both of these are the primary causes of failure for a rubber membrane. 90003 90002 Longevity of TPO roofing varies greatly due to issues with membrane’s formulation. Currently, they range from 7-20 years. Manufacturer warranty is up to 20 years for commercial TPO installs and none for residential. 90003 90002 Keep in mind that warranties offered on different types of single ply membranes vary greatly depending on thickness, size, method of installation, and environmental conditions. Thus, you should carefully read and compare warranties for different materials you are considering.90003 90002 Tar & Gravel as well as Modified Bitumen roofs last about 10-20 years, but are very costly to remove at the end of their service lives. How long they last greatly depends of the installer, because today there are very few roofers who actually know how to work with this material. If you have one of these roofs and it needs repair, it is best to call on a pro who has experience with it; someone who does single membranes will not do a very good job. 90003 90020 Durability 90021 90002 We will cover in extensive detail the most common problems that impact the durability of a flat roof.90003 90079 Leaks / Moisture 90080 90002 90003 90002 The biggest problem for most flat roofs is the presence of seams and flashing, because that is precisely where leaks occur. 90003 90002 PVC and TPO are the only two membranes that have hot-welded seams that will never come apart, and therefore do not allow any moisture to penetrate. 90003 90002 Tar and gravel, modified bitumen and rolled asphalt offer extremely poor protection against leaks and ponding water. 90003 90002 EPDM rubber typically fails at roof penetrations, flashing and seams, allowing moisture to penetrate.90003 90002 One of the biggest issues with spray-on roofs is that the insulation can be eaten by birds, therefore also resulting in leaks. 90003 90079 Puncture resistance 90080 90002 90003 90002 Built-up roofs are typically 0.5 + inches in thickness, are made from hard materials and are therefore very difficult to puncture. 90003 90002 Single plies and spray foam roofs are generally easy to puncture by direct contact with a sharp object. 90003 90002 Some PVC materials come with a fiberglass reinforcing scrim, which makes it very difficult to puncture.90003 90002 Keep in mind that increasing the width of a single ply membrane DOES NOT improve its ability to protect against leaks, However, it can extend its overall life, and makes it more puncture resistant. 90003 90009 90020 Importance of insulation 90021 90002 If you are planning to install a flat roof, it is very important to put in high-quality insulation, with appropriate R-value. Without it, you will be wasting a lot of money on heating and cooling costs. You will also experience severe temperature fluctuations inside your house.90003 90002 The best product out there is Polyiso rigid foam. It is also the most expensive; 90005 $ 55 per 100 sq.ft. 90006 for 1 inch of insulation, which has a 6 R value. It is available in various thicknesses, at 1 inch increments. 90003 90002 We recommend you consult with your contractor to figure out what type of insulation will work best for your home, and how much of it you will need. 90003 90355 90002 90005 Pro Tip: 90006 It is not a good idea to save money on insulation. It will only result in decreased service life of your roof, poor energy efficiency, as well as uncomfortable temperatures inside your home.Most likely, you will end up spending more money to fix insulation problems, which could have been avoided from the beginning. 90003 90360 90020 Maintenance and repair 90021 90002 A typical flat roof repair costs at least $ 350 — 400 and involves locating sources of leaks and patching the seams or holes. However, depending on the severity of the damage, and the type of material installed, repairing a flat roof can cost as much as $ 600-800 +. 90003 90002 PVC membranes are easy to maintain and repair.Their heat-welded seams remain weldable throughout their service life, which makes any repair, maintenance or modifications to install new equipment fast and simple. 90003 90002 A typical repair of a heat — welded membrane, such as TPO or PVC consists of welding a patch on the membrane over the hole that has been discovered as the source of a leak, or re-welding a void in the seam. 90003 90002 If no leaks occur, its still recommended to re-seam (apply 6 inch cover tape over all seams) an EPDM rubber every 7-10 years, when adhesive starts to naturally fail.Repairs are done using EPDM peel & stick flashing + EPDM primer (recommended method) or using older black glue. Penetrations are repaired using uncured flashing that can be stretched to form around angled surfaces. 90003 90002 Built-up roofs are very difficult and expensive to fix, or even to find the source of the leak. 90003 90002 You can fix a rubber roof yourself by using this rubber roof repair 90374 kit 90375. 90003 90002 EPDM Roofing Repair Kit 90003 90020 Unique applications and benefits 90021 90002 A flat roof is the best material on a very large size building.Installing a pitched roof on such a building is not recommended, because it will be a lot more difficult, and costly. It will also require special engineering to accommodate the additional structural weight, as well as rooftop HVAC equipment and drainage. 90003 90002 One of the most unique features of flat roofs is that most can be utilized as a deck, green roof (rooftop garden), patio or penthouse. Green building enthusiasts prefer these systems, because they can be turned into rooftop gardens.A side benefit of a rooftop garden is that it improves air quality and reduces the heat island effect in large urban areas. 90003 90002 If you are planning this type of application, it is best to use 80 mil or thicker PVC or TPO membrane, because hot-air welded seams ensure that the roof will not leak under the soil and plants. 90003 90002 Another advantage is that flat roofing works best in cases when large HVAC equipment needs to be installed. It can go straight on the rooftop, instead of being installed on the ground.90003 90002 Lastly, these roofs are great for large-scale solar PV installations, as they are typically not shaded and get very strong sun exposure throughout the day. 90003 90009 90020 Energy efficiency 90021 90002 One of the greatest advantages of a flat roof house is that it can be highly energy efficient. Both TPO and PVC roofs are considered to be very reflective, with up to 90% of heat back into the atmosphere. This means that one of these membranes can help you save hundreds of dollars on your energy bills.Both are Energy Star Rated for their cool properties. 90003 90002 It is important to note that white color roofs collect a lot of dirt and dust over their lifetime. Over time, this decreases their energy efficiency. However, they still remain highly reflective. Good, regular maintenance can help prolong optimal energy efficiency of a white membrane. 90003 90002 Today, many darker color membranes are are also formulated to have light-reflective properties and offer energy savings. You should check the manufacturer’s specifications on a particular product to see its efficiency ratings.90003 90002 Modified Bitumen and EPDM offer the lowest energy efficiency. In fact, because they are so dark, they can heat up to 170 degrees in the summer, making your HVAC system run over-time and rake up huge energy bills. 90003 90020 Environmental Impact 90021 90002 90003 90002 Both TPO and PVC are 100% recyclable. At the end of their service lives, old membranes get recycled back into making new ones. 90003 90002 It is possible to install PVC over an old roof, thus eliminating tear off, which cuts your costs and saves landfill space.90003 90002 On the other hand, EPDM, Tar & Gravel, Modified Bitumen are not eco-friendly. They all can not be recycled, because they are made from petroleum based by-products. Therefore, they have to be landfilled. 90003 90009 90002 90079 90415 Related 90416 90080 90003 This roofing guide is presented by Leo B. 90002 I’ve been a roofer for 15 years, and specialize in Metal Roofing and Flat Roofing. 90003 90002 Have a roofing question or issue? 90374 Ask me any roofing question! 90375 90003 90002 Roofing Contractors — join our free 90374 Local Roofers directory 90375 to get more customers! 90003 90009 .